Helicon Remote manual
About Helicon Remote
Workflow and settings
Connecting a camera
Setting up the camera for use with Helicon Remote
Shooting a stack using Helicon Remote
Setting exposure parameters
Setting focus bracketing parameters
Setting exposure bracketing parameters
Setting burst shooting parameters
Setting burst bracketing parameters
Advanced techniques
Using Helicon Remote for time-lapse
shooting
Shooting in mirror lock-up (MLU) mode
Using auto focus
Shooting with flash
Using the "Take a picture" function
Hyperfocal distance calculator
Interface and customization
Reading a histogram
Customizing the Live View
"Preview" and "Fast preview"
How to find the images
How to save the images on camera memory card
Preferences
Reporting a bug
External hardware
Using Helicon Remote to drive a StackShot macro
rail
Using Helicon Remote to control a Trinamic
motor
Using Stackshot and Trinamic on Mac OS X 10.9 and later
Compatibility and licensing
Camera compatibility
Licensing
Installation and upgrade
Hardware and software requirements
About Helicon Remote
Helicon Remote is a software program for tethered shooting. Its main purpose
is automating the process of shooting stacks of partially focused images,
which can later be blended into one completely focused image using Helicon
Focus. Helicon Remote automates much of the process of shooting such stacks:
once you set the parameters, the program does the shooting. It also helps you
set the correct parameters, i.e., it helps you calculate the necessary number
of shots and the number of focusing steps between them.
Helicon Remote allows combined focus and exposure bracketing. For exposure bracketing you can
specify the necessary number of shots and the size of exposure compensation
steps between shots (2 Ev, 1 Ev, 1/2 Ev, or 1/3 Ev). This means you are not
limited to the -2Ev - +2Ev range offered by most cameras.
Helicon Remote also automates time-lapse shooting in combination with focus
and exposure bracketing. You can set up your camera to shoot either stacks or just one shot at regular time intervals (which you can specify).
Helicon Remote
can control Trinamic stepper motors and move StackShot macro rails. Both of these are external devices that can adjust the camera's position with tiny steps of up to 0.01 mm, allowing you to take pictures of tiny objects.
Helicon Remote is available for Windows, Mac OS and Android.
Helicon Remote is a solution for home, studio, and also the outdoors. It can
be installed on any recent-model tablet PC, netbook, Android tablet or smartphone and thus easily taken
into the field.
The main work screen has a toolbar and several working panels:
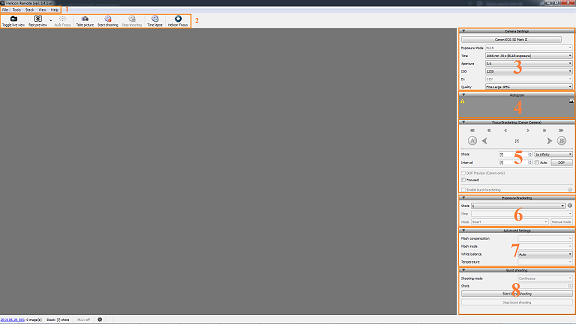
1-Main menu
2-Toolbar
3-Camera settings panel
4-Histogram
5-Focus bracketing panel
6-Exposure bracketing panel
7-Advanced settings panel
8-Burst shooting panel
Please note that all the panels may not fit into a smaller display. If so, please use the scroll bar. You can also collapse a panel that you rarely need by clicking its title. Click again to unfold the panel.
Connecting a camera
Helicon Remote for Android, Win and Mac OS supports both USB and Wi-Fi camera connection. Using Helicon Remote on an Android device requires using OTG adapter.
Helicon Remote for iOS connects to a camera only via Wi-Fi.
If you are planning to connect your camera via Wi-Fi, please follow the instructions.
Setting up the camera for use with Helicon Remote
Make sure to set up the camera body before connecting it with Helicon Remote:
- Set one shot focusing mode: One-Shot AF (Canon)/AF-S (Nikon). The newest Canon cameras (starting with 70D) have a distinct focus mode setting for live view. It can only be accessed while live view is turned on. For these cameras you must set the "AF method" to FlexiZoneAF[] (note the square brackets) and turn continuous AF off.
- Switch HDR off.
- Set the drive mode to "Single shot". No silent release etc., just plain single shot.
- Nikon: switch mirror lock-up off.
- Canon: disable quick review, it might disrupt focus bracketing. It's OK to leave quick review on if you don't do focus bracketing.
- Canon: sometimes resetting custom function settings helps solve weird issues.
Shooting a stack using Helicon Remote
- Connect your camera to a computer with a USB cable. Then switch the camera
on and run Helicon Remote — or vice versa.* Set your lens to Auto Focus
(AF) mode. This will enable Helicon Remote to control the lens. Helicon Remote
will automatically take control of the camera and you will see the Live
View image on the screen.
If this doesn't happen, try reading our FAQs for a possible solution.
- Make sure to set up the camera body settings.
- Set the exposure parameters: aperture, exposure time, ISO, etc. Read more
about exposure parameters here.
-
Set the nearest and farthest focusing points. Focus on the front of
the object and click  button to save the nearest point; next focus on
the back of the object and click
button to save the nearest point; next focus on
the back of the object and click  button to save the farthest point.
The program calculates the number of shots and the interval between them automatically.
button to save the farthest point.
The program calculates the number of shots and the interval between them automatically.
Read more about setting A and B points, about the DOF calculator, and other
focus bracketing parameters here.
- Press the Start shooting button.
- After shooting is finished, Helicon Remote will ask if it can open the
stack in Helicon Focus. There you can process the stack and view the
resulting image with extended depth of field. Read about Helicon Focus here.
*On Windows XP first switch the camera on,
close the AutoPlay menu and then run Helicon Remote. For all other operating
systems, the order of these two steps doesn't matter.
Setting exposure
parameters
Helicon Remote allows you to change the following parameters (see Camera Settings controls at the top of the right panel):
Before shooting a stack, check that the exposure parameters are correct. To
do this, take a trial shot using the preview or fast
preview function. Or just take a look at the histogram. The Highlighting of overexposed areas feature can also help to set the correct exposure.
Helicon Remote can also control other camera settings (see the Advanced Settings controls at the bottom of the right panel): Flash compensation, Flash mode, White balance, Color temperature, etc. The list of advanced
settings may vary for different camera models.
- Flash compensation: can be set for
built-in flash only.
- Flash mode: can be set for
built-in flash only.
- White balance
- Color temperature: can be changed
only after you set the White balance to "Color temperature."
Setting focus bracketing parameters

The most important parameters for focus stacking are and points, i.e. the nearest and farthest focusing points. As soon
as the program knows these two endpoints, the current aperture and focal
length of the lens, it can calculate the number of shots needed. If the Auto checkbox is selected, the program will
calculate this automatically (but don't forget to set the right correction factor first, otherwise the results might be not perfect).
The simplest workflow is as follows:
- Focus on the front of the object and click the button to save the nearest focusing point (CTRL+ALT+N).
- Use the arrow keys (
 or
or or
or  ) to move the focus to the back of the object and click the button to save the farthest
focusing point (CTRL+ALT+R).
) to move the focus to the back of the object and click the button to save the farthest
focusing point (CTRL+ALT+R).
You can also do the reverse, saving the farthest point first and then
moving to the nearest point. It makes no difference.
- Press the Start shooting button
 .
.
It is also possible to specify a starting point (either A or B - it doesn't
matter), the number of steps, and the interval. This will be enough to start
shooting, as the program will also calculate the endpoint. For this situation,
deselect the Auto checkbox.
The Shots parameter shows how many shots will be
taken. If you change this parameter and both endpoints are defined, the program
will recalculate the interval between shots.
The Direction parameter determines whether the
focal plane will move towards camera or infinity. If both endpoints are
set, this option is not important, but you should check it if you have only set
one of the focusing points.
The Interval parameter defines the movement of the
lens between two adjacent shots. The distance is measured in steps of the lens'
motor (focusing steps) and is roughly equivalent to the rotation of the
focusing ring by a specific angle. Please note that both this parameter and the
depth of field (measured in millimeters) are nonlinear functions. As a
result, the distance between shots is roughly the same for all of the lens'
focus distances.
Use the  keys to move the lens a single focusing step, the
 keys to move the lens by 5 focusing steps and the
  keys to move by 25 focusing steps. These are the default values,
you can adjust them in Preferences. You
can also choose different sizes of focusing steps in Preferences for Canon and Nikon cameras,
StackShot rails and Trinamic motors.
keys to move by 25 focusing steps. These are the default values,
you can adjust them in Preferences. You
can also choose different sizes of focusing steps in Preferences for Canon and Nikon cameras,
StackShot rails and Trinamic motors.
The 
 keys allow quick navigation between the nearest and the farthest
points. You can use them to make sure that the focusing points have been saved
correctly before shooting a stack.
keys allow quick navigation between the nearest and the farthest
points. You can use them to make sure that the focusing points have been saved
correctly before shooting a stack.
The DOF preview and the Highlight focused areas functions are described below in the Customizing Live View section.
Setting burst shooting parameters

Apart from taking single shots, your camera supports burst shooting mode, allowing to take series of shots in very quick succession. For instance, if you're shooting a subject that is not still this mode may help you avoid blurring caused by its movement. Helicon Remote gives you the possibility to set the parameters and remotely control your camera in burst shooting mode.
Burst shooting settings menu is located at the bottom of the working panel in the right part of the screen. There are just few parameters to be set, different for Canon and Nikon cameras.
Nikon:
for Nikon cameras you need to set the Shooting mode (Continuous or Continuous high-speed), which basically defines the shooting speed, and to set the number of shots you want to take.
Canon:
with Canon cameras you cannot choose the shooting speed or set the number of shots. The shooting process is controlled with two buttons - Start burst shooting and Stop burst shooting.
Once all the adjustments are set up press the Start shooting button. The specified number of shots will be taken.
Helicon Remote can combine burst shooting with focus bracketing for shooting focus stacks very quickly. You can see more details in the Burst Bracketing section of this Help.
Setting burst bracketing parameters
Burst bracketing is a method of shooting focus stacks much faster than with regular focus bracketing.
Combining focus bracketing and burst shooting modes can open up new, much wider focus stacking opportunities for amateur and professional photographers. It allows making a series of shots in quick succession while changing position of the focal plane, which after being processed in Helicon Focus will produce a fully focused image. The basic idea is to mount the camera on a Stackshot macro rail and to perform burst shooting while the camera is moving at constant speed. This is much faster than conventional shooting without utilizing the burst mode.
For burst bracketing you will need a camera and a StackSHot macro rail connected to computer.
When you set the A and B points the program calculates the distance between points. The number of shots and the interval between them will be calculated automatically (if Auto mode is enabled), and the only missing variable we need is the camera movement speed. In order to calculate this speed and to perform shooting successfully Helicon Remote must know the camera's burst shooting speed measured in frames per second (FPS). It's a characteristic of the camera that varies depending on shooting conditions. Current exposure time, ISO, some settings of the camera body (like noise reduction) influence the FPS value, so all we need is to measure it once everything is set up. It is safe to assume that FPS will stay the same as long as all the settings are the same, and it will most likely change if the settings are changed. Once FPS is measured and the program has all the inputs - distance, number of shots, shooting speed (FPS) - it needs to calculate how quickly the camera should move along the rails to fit this number of shots in this distance at a current shooting speed (FPS).
Here is the general algorithm for setting up burst bracketing:
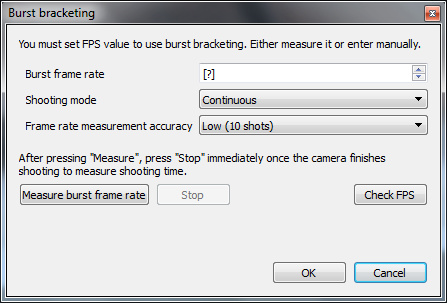
1. Open the Burst bracketing menu: main menu -> Tools -> Burst bracketing..
2. If you have a Nikon camera, select the Shooting mode (regular or high speed). This option is not available for Canon cameras.
3. Choose the Frame rate measurement accuracy - the number of test shots that will be made during FPS measurement. More samples - higher accuracy.
4. Press the Measure burst frame rate button.
Canon camera: the camera will make a series of shots and will automatically calculate and display the result in the Burst frame rate field.
Nikon camera: the camera will make a series of shots. You must click the "Stop" button as soon as the camera finishes shooting. Helicon Remote will then calculate and display the result in the Burst frame rate field. The sooner you are able to press "Stop" after the last shot of the sequence is taken - the more precise the result will be. You should repeat the measurement 3-4 times until the result is stable.
5. For Nikon cameras there's a Check FPS option. Press this button after the measurement is done and listen to the sound notification at the start and in the end of shooting. If the signals do not coincide with actual start and end of shooting, the measurement was not precise. Repeat the measurement and the check once more. If the problem persists, please send a Bug report to our developers for investigation.
6. Press OK.
7. Go to Focus bracketing panel in the right part of the screen and check the Enable burst bracketing checkbox.
8. Proceed as with usual focus bracketing parameters.
9. Start shooting.
Keep in mind that significant altering of ISO or exposure time will most likely alter the FPS, so you'll have to measure it again. FPS is influenced by many factors, so the safest will be to repeat the measurement if you alter any camera settings.
Using the depth-of-field (DOF)
calculator

The DOF Calculator helps to set the correct interval between shots, which should not
exceed the depth of field estimated by the calculator. Both the interval
between shots and the DOF values provided by the calculator are measured in
focusing steps (lens motor steps, lens rotation). This DOF is different from
the optical DOF as measured in mm. DOF in lens steps rarely depends on focusing
distance.
The DOF calculation is based on the current aperture, focal length and lens
correction factor.
The program fills in the aperture and focal length if this information is
available. You can adjust these parameters if you prefer or if you plan to use
different camera settings.
The correction factor varies for different types of lenses. You can try and work
with the default value of "1," but there is a chance you will take too many
or too few shots. Ideally, you should find the right correction factor for each
type of lens. You can read how to do this in the next section.
Finding the
right correction factor
Different types of lenses have different internal mechanics, so we recommend
that you find the correction factor for each of your lenses.
If the correction factor is too big, then the estimated interval between
steps will be larger than the real DOF. When you merge the stack, the resulting
image will not be completely in focus. If the correction factor is too small,
then the resulting image will be completely in focus but the program will take
more shots than necessary.
To check if default correction factor is optimal for your lens, follow these
steps:
- Set camera to Manual exposure mode and then set aperture wide open (f/2.0-4.0).
- Focus on some point in the image that has a lot of detail, such as a roughly textured fabric, or a page of text in a book.
- Uncheck Auto checkbox in the Focus bracketing panel of Helicon Remote.
- Open the DOF Calculator and check that the correction factor is set to
its default value of "1.00."

- Enter the number of shots (10) and define the direction (to infinity). Now you are ready to start shooting, as the initial focusing point, number
of shots, interval between shots and direction have all been defined.
- Shoot the images and then process the stack with Helicon Focus once
you're done. As you can see (above), every part of the image is sharp. This means that
the focused areas of the source images overlap and that the DOF calculator
suggested the correct value for the interval between the images.

- Now set the correction factor to 2.0 and shoot another stack with a
larger interval between the images. After processing the stack with Helicon Focus, you will notice that the
result contains areas (stripes) that are out of focus.

This test proves that increasing the correction factor — and therefore the
interval between shots — results in a partially soft image, which happens
because the DOF is smaller than the interval between shots. Thus the focused
areas do not overlap when all the shots are stacked together.
As a general rule, the correct value should produce a completely focused
image and the doubled value should give a regular pattern of
focused and unfocused areas.
To find the right correction factor:
1) Create and process a stack. If you see a regular pattern of focused and
unfocused areas, you need to lower the value of the correction factor. Decrease
its value until you get a completely focused resulting image.
2) Double the correction factor. Then create and process a stack. If you do not see a regular pattern of focused and unfocused areas, you need to
increase the value of the correction factor. Do so until you see this pattern.
After completing this procedure, divide the value by two.
Setting
the exposure bracketing parameters
You can use automatic or manual exposure bracketing modes with Helicon
Remote.
Automatic exposure bracketing
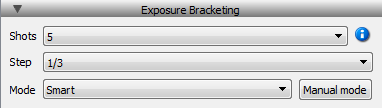
- Set the camera to Manual exposure mode.
- Define the number of shots (Shots, Exposure bracketing controls).
- Define the exposure shift between shots (1/2, 1/3, etc.) (Step, Exposure bracketing controls).
- Choose the exposure bracketing mode, which sets the priority of parameters to be changed in order to change exposure (Smart mode (default) - will increase exposure time in order to increase the exposure value and will reduce ISO in order to decrease it. ISO, then time mode - the program will work with ISO, and only if the extreme value is reached, it will have to change the exposure time. Time, then ISO option is based on the same principle.)
Manual exposure bracketing

- Set the camera to Manual exposure mode.
- Define the number of shots (Shots, Exposure bracketing controls).
- Click the Manual exposure mode button. The Manual exposure mode dialogue will appear. Here you can set
the exposure shift, shutter speed, ISO, and aperture for each shot.
To increase/ decrease the values of one column by the same value, use
the "plus" and "minus" buttons. To change one value, click on the cell and
select a value from the drop-down list.
Using
Helicon Remote for time-lapse shooting
Time-lapse shooting is when you leave your camera to take shots
automatically every few seconds, minutes, or hours.
Why would you do this? If your object is changing over time you may want to
capture its different stages and then combine the shots into a movie. For
example, you could capture a flower bud opening, a piece of fruit as it ripens,
traffic on a busy street during the period of a day, or whatever suits your
fancy.
The main limitation with time-lapse shooting is the life of the camera
battery. In order to increase this, switch off Live View during shooting: File →
Preferences → Shooting → Activate live view when taking a shot:
No. For Nikon cameras you also have to set your lens to manual focusing mode (MF). If a Canon camera still switches the LiveView on despite of the setting, also set the lens to manual focusing mode (MF).
To start time lapse shooting, press the Time lapse button on the toolbar.

The time lapse window will appear:

Set the number of time lapse shots, the time interval between them in seconds; if needed, the first shot can be dalyed for a specified time period.
With Helicon Remote, you can combine time-lapse shooting with focus stacking
and exposure bracketing. To enable such complex bracketing mode, check the relevant checkbox.
Preview option will allow you to make one shot, and the image will be opened immediately in the default image viewer. It will not be saved to the disk.
Using Mirror Lock-Up (MLU)
Helicon Remote detects MLU mode for Canon cameras (see status bar) and behaves accordingly. Nikon cameras have two different settings: Mirror Lock Up (Mup) shooting mode and Exposure delay. Exposure delay is not indicated by Helicon Remote but it functions properly. Mup mode has no effect on Helicon Remote, it will function as if the regular Single shooting mode is set.
In order to use MLU with a Canon camera, simply find and activate the MLU mode (or mirror
pre-fire) in your camera settings. In Helicon Remote's preferences you can set
the delay for MLU mode: File → Preferences
→ Shooting → Canon → Delay for MLU mode. This delay allows the
camera to become still after raising the mirror. The less the camera vibrates,
the sharper the image will be.
Helicon Remote should detect when you activate MLU in your camera settings.
You can check for MLU activation on the left side of the status bar, which is
along the bottom of the program window. (It will read "MLU: on" or "MLU:
off.")
Using the Auto focus function

You can use this function to focus on the nearest or farthest part of an
object. Click on the area on which you wish to focus and the camera lens will
focus automatically.
The typical workflow is:
- Auto focus on the nearest point and save it.
- Using Helicon Remote's arrow keys move the focus to the farthest
point and save it.
Helicon Remote waits for a specific number of seconds for the lens to focus;
the default is five seconds. For Canon cameras, you can change this in
preferences in the main menu: File →
Preferences → Shooting → Canon → Auto Focus time.
Shooting with flash
If you are using a Canon camera with a non-Canon flash you have to switch
Live View off during shooting in order for the flash to fire. You can set this in preferences by going to the
main menu and choosing: File → Preferences
→ Shooting → Activate live view when taking a shot:
no.
Using the Take a picture function

This function allows you to shoot stacks manually: focus on one spot, take a
shot, focus again, take another shot, etc. Please note that bracketing parameters are also taken into account. If focus and exposure bracketing is active, the camera will take several shots.
Hyperfocal distance calculator
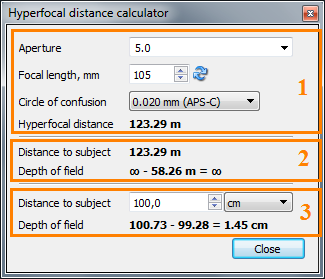
The hyperfocal distance is the distance beyond which all objects are acceptably sharp, for a lens focused at infinity. Hyperfocal distance calculator contains three blocks. The first, the top one calculates the hyperfocal distance for current lens at current shooting conditions; the second one allows to define the depth of field at this distance; the third one enables you to know the depth of field at a specific distance. The depth of field is shown as a distance range and as an absolute value.
To use the calculator go to main menu→Tools→Hyperfocal distance calculator.
- aperture, focal length and circle of confusion will be defined automatically, though you can change them manually and see how the hyperfocal distance will change. See the calculation result at the bottom line of the first block;
- in the next block you will see the depth of field for the current hyperfocal distance;
- in the last block you can input the distance to the subject and find out the depth of field at this distance.
Reading a histogram

A histogram can help determine whether or not the exposure settings are
correct.
The horizontal axis represents the range over which the brightness of pixels
can vary (from 0 to 255). This is the dynamic range of a digital
image. The vertical axis represents the number of pixels with a given
brightness. Dark pixels are on the left side of the histogram and bright pixels
are on the right.
Therefore, if there are "hills" on the left side and nothing on the right,
this can mean that your image is underexposed, and vice versa.
Customizing the Live View
The DOF preview checkbox controls the
aperture. If it is not enabled, the camera will produce the Live View image
using the widest aperture regardless of the aperture value in the
camera settings. Enabling DOF preview sets the actual aperture for Live View mode. The DOF preview only works for Canon cameras and only if Live
View is NOT in Exposure Simulation mode.
The Highlight focused areas tool
helps you see which areas are in focus at the moment. You can change the
sensitivity of focus highlighting in Preferences.
You can turn on and off the gridlines for the Live View in Preferences. The gridlines can help to frame your image and to keep your horizons level and the vertical elements in your photo straight.
To remove noise from the Live View you can activate the Noise averaging feature in Preferences. This can result in clearer image and allows to focus more precisely.
To see the overexposed areas, you can activate the Highlighting of overexposed areas by clicking on the warning triangle button  in the top left corner of the histogram. If your camera is in the Exposure simulation mode, then you will see the exposure warnings for the current exposure settings on the Live View image. If the Exposure simulation is disabled (for Canon cameras) or is not available (for Nikon cameras) you can use the Fast preview function to see the exposure warnings for the current exposure settings.
The Exposure simulation function attempts to display the expected outcome of your chosen exposure settings; this function exists in most Canon cameras.
Preview and Fast preview functions

Use these functions to evaluate the exposure settings before shooting a
stack.
The difference between Preview and Fast preview is in the way image is displayed.
Fast preview shoots a JPEG (either small, normal quality, or large, fine quality according to the Preview quality setting) and opens it in Helicon Remote for several seconds. You can set the preview time in preferences: File → Preferences → Interface preferences → Fast preview time. Fast preview allows you to zoom in for examining fine details of the image. A single left mouse button click (or tap on Android) zooms in, a second click or tap returns to the original size. You can zoom in and out gradually with the mouse wheel or pinch gesture on Android.
Preview shoots an image at the same
quality level as are in the camera settings and opens it in the default image
viewer.
How to find the images
There is a group of settings in the Preferences dialogue (File → Preferences or CTRL + ALT + P) called Image Saving that defines where the images will be saved after shooting. You can choose separately for RAW, JPEG images, and video files whether they should be moved to computer and deleted from camera, or copied to the computer or left in camera.
You can also choose the folder where the images should be saved (Folder for images). In main program you can see the name of the current image folder in the bottom left corner. If you click on it, the folder will open in the default system file manager (Explorer / Finder).
How to save the images to the camera's memory card
For most cameras you just need to open the Preferences dialogue (File → Preferences or CTRL + ALT + P), find the group of settings called Image Saving and set the values for Download JPEG images after shooting, Download RAW images after shooting, and Download movies after recording to "Leave in camera" or "Copy to computer" (the images will be saved both on camera memory card and on computer hard drive).
If your camera is Nikon D90 / D300 / D700 / D3 / D3s / D5000, saving to memory card is only possible if the lens is set to manual focus mode and the preference File → Preferences → Shooting → Activate live view when taking a shot in Helicon Remote is set to "No". This means that you cannot perform focus bracketing by driving the camera's lens and save the images to a memory card with these cameras.
Preferences
Interface

| Language |
Changes the interface language. |
| Fast preview time |
Determines how many seconds the fast preview picture will stay on the
screen. |
| Image review |
Determines how many seconds the new image will stay on the
screen after you've shot it. |
| Live view rotation |
Rotates or mirrors the Live View image for your convenience. |
| Background color |
Determines the color of the background behind the Live View
image. |
| Live View noise averaging |
Turns on / off the noise averaging for the Live View. Noise averaging can result in clearer image and allows to focus more precisely. |
| Focus highlighting |
Affects the "Highlight focused areas" feature. If set to "Low sensitivity,"
it only highlights the few most contrasting areas; if set to "Medium sensitivity," it also highlights less contrast areas. "High sensitivity" can detect even fine image features but is highly subject to noise. |
| Show grid |
Turns on / off the gridlines for the Live View. |
| Activate Live View upon connecting to camera |
Set it to "No" if you don't want the Live View to appear upon connecting to camera; activating the Live View takes several seconds and may slow down your work. |
| Increase Live View brightness |
Increases Live View brightness in order to view the image better in dark shooting conditions. Disabled as default. |
Click the Show all hidden dialogs button to renew showing all
prompts; this is especially useful for certain prompts, such as "Are you sure
you want to delete this image?" where you may have selected the checkbox "Don't
show this window again" in the past. With this button, you can see all such prompts again.
Shortcut keys
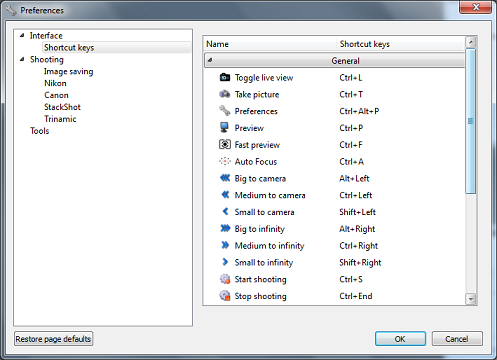
This tab gives a list of commands and shortcuts. You can also set your own combination of keys for each.
Shooting
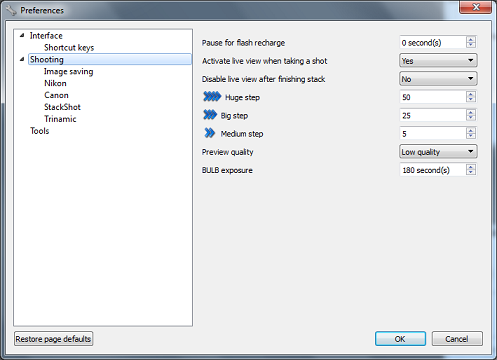
Image Saving

| Folder for images |
Chooses the folder where the images will be saved. Helicon Remote will create subfolders for new stacks inside
this folder. |
| File naming |
Determines automatic file naming. Includes month, counter, day, file counter (unlike 'counter' does not reset upon program restart, updating or reinstallion. Can only be reset manually by clicking on the Reset file and stack counter button), month no., stack counter (similar to аду counter), year 2/4-digits. |
| Folder naming |
Determines automatic naming for the folders that Helicon Remote
creates for new stacks. If empty, all the created images will be put in the folder indicated in the Folder for images line. Template includes month, counter, day, file counter (unlike 'counter' does not reset upon program restart, updating or reinstallion. Can only be reset manually by clicking on the Reset file and stack counter button), month no., stack counter (similar to аду counter), year 2/4-digits. |
| Download RAW images after shooting |
You can choose what you will do with RAW images after
shooting: move to computer (delete from camera), copy to computer, or
leave in camera. |
| Download JPEG images after shooting |
You can choose what you will do with JPEG images after
shooting: move to computer (delete from camera), copy to computer, or
leave in camera. |
| Download movies after recording |
You can choose what you will do with movies after
shooting: move to computer (delete from camera), copy to computer, or
leave in camera. |
| Create new folder for the new stacks |
If set to "yes," a new folder will be created for every new stack. If
set to "no," a new folder is created after the program starts and all
the created stacks will be saved to one folder. In order to create additional folder for the next stack, go to main menu\Stack\Create new stack folder. A new subfolder will be created in the Folder for images. |
| Reset file and stack counters |
Resets file and stack counters in the file or folder naming. This is the only way they can be reset. |
Nikon

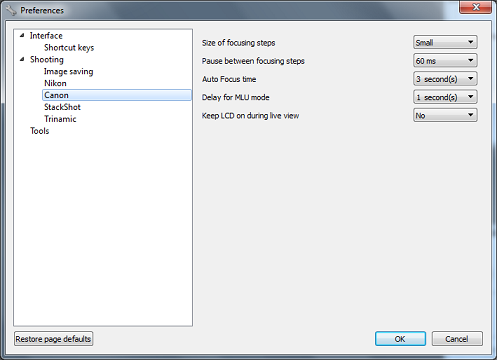
Canon
StackShot
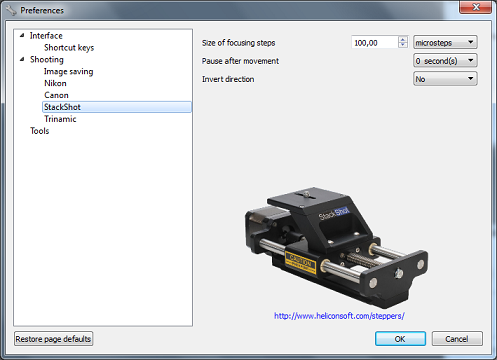
| Size of focusing steps |
You can set the size of the focusing steps in micro
steps, millimeters or inches. Set the number of focusing steps made
with the and keys here. |
| Pause after movement |
A pause may be required after the StackShot moves, so that the camera
becomes still before taking a shot. |
| Invert direction |
This may be useful for correlating the physical and logical movements
of the StackShot. For example, if you click (move to the right) in Helicon Remote and the camera
actually moves to the left, you will probably need to invert the
direction. |
Trinamic

| Size of focusing steps |
You can set the size of focusing steps in micro steps and
degrees and then you can set how many focusing steps are made when
choosing the and keys here. |
| Pause after movement |
A pause may be necessary after the motor moves to allow the camera to
become still before the next shot. |
| Maximum acceleration |
You can limit the maximum acceleration for smoother movements. |
| Maximum torque |
You can limit the maximum torque to avoid damaging the motor. |
| Invert direction |
This can be useful for correlating the physical and logical movements
of the motor. For example, if you click (move to the right) in Helicon Remote and the camera
actually moves to the left, you probably need to invert the
direction. |
| Enable limit switches |
Trinamic has two pairs of pins for connecting two limit switches (left and right). If this option is enabled, hitting any of the switches will stop Trinamic from moving. Only enable it once you have switches connected, otherwise the motor will not move at all. |
Tools
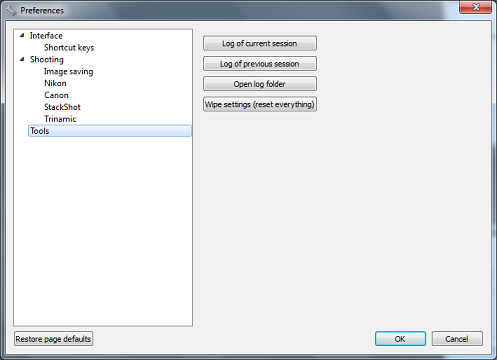
| Log of current session |
Should be used in case of a problem upon request of the developer. |
| Log of previous session |
Should be used in case of a problem upon request of the developer. |
| Open log folder |
Should be used in case of a problem upon request of the developer. |
| Wipe settings (reset everything) |
Resets all of the program settings to defaults. Please be aware that not only Preferneces settings will be reset, but all the adjustments made in the program. |
Restore page defaults
Resets the settings of the current Preferences tab to defaults.
Reporting a bug
If you have any trouble using Helicon Remote or notice any strange behavior
in the program, please let us know the details so that we can help you ASAP.
You can give us the details we need by using the Report a bug function, which you can find in
the main menu: Help → Report a bug.

If Helicon Remote behaves strangely, but doesn't crash, just go to the main
menu and select: Help → Report a
bug.
If Helicon Remote crashes, restart the program. When it reopens, select: Help → Report a bug.
In the Report a bug dialogue, you can enter
your email address and type in comments. If you give us your email address, we
can send you a link to a new version of the program with the bug corrected.
You can select the checkbox Show the data to be sent to see that no
private data is being sent. If for any reason the report cannot be sent (a computer that runs Remote is not connected to Internet, for example), you can copy the data from the Report a bug dialogue, and send it manually to heliconsoft@gmail.com along with a description of the problem.

Using Helicon Remote to
drive a StackShot macro rail
StackShot is an electronically controlled macro rail. (See a complete
description at: http://www.cognisys-inc.com.)
The USB version of StackShot costs $525.00 (price as of Nov. 7, 2011). This
includes the StackShot controller with USB cable, stepper motor-enabled macro
rail, AC adapter (US, EU, AUS, or UK), and a 2m motor cable.


- Attach your camera to the StackShot macro rail.
- Connect the camera to your computer via the USB cable. This is an optional step, you can control Stackshot without any camera connected as well.
- Connect the StackShot to the computer via the USB cable. Make sure its power supply is connected as well, or Remote will report errors and may even hang while communicating with StackShot.
- Run Helicon Remote. It should connect to StackShot automatically and the Focus Bracketing panel should become usable. If, however, that didn't happen and focus movement buttons are disabled (which can happen if you have more than 1 stepper motor connected, for example), you have to manually tell Remote to connect to StackShot. To do that, press the "Select a camera" button at the top right corner of the screen on the Camera Settings panel, find StackShot in the list and click it once with the left mouse button.
- Press the arrow keys to see how Helicon Remote is controlling the StackShot.
Using Helicon Remote to control
a Trinamic motor
We developed and tested Helicon Remote with a Trinamic PANDrive
PD3-110-42-232. This is a compact and strong stepper motor with a maximum
torque of 0.49N-m and stall protection. See the technical data
sheet for more details.
In all likelihood, other Trinamic motors are also compatible with the
program, as they have the same programming interface.

The Trinamic PANDrive PD3-110-42-232 currently costs $200-250 and can be
purchased from the following online stores.
You will also need a USB-RS232 converter ($30-40) to connect the motor to a
computer.

You may find similar converters in computer shops. Make sure the converter
uses an FTDI chip so that the program can find it.
You will also need a power supply with 12-28V DC voltage and a maximum
current of at least 1.5 amps. Almost any laptop power supply will conform to
these specifications.
The image below shows how to wire the USB converter and Trinamic motor.

The procedure for connecting Remote to Trinamic motor is the same as for StackShot (see the previous section of this document).
Using Stackshot and Trinamic on Mac OS X 10.9 and later
There is a known problem on Mac since OS X 10.9, because of which Stackshot and Trinamic don't work out of the box. Solution:
-
Start a terminal session (Go > Applications > Utilities > Terminal)
-
Copy/paste the following text to the command prompt:
cd /System/Library/Extensions/IOUSBFamily.kext/Contents/Plugins
sudo mv AppleUSBFTDI.kext AppleUSBFTDI.disabled
sudo touch /System/Library/Extensions
-
Reboot Mac OS. Stepper motors should be detected by Remote now.
Camera
compatibility
Helicon Remote works with Canon and Nikon DSLR cameras that support Live
View mode.
The following is a list of compatible cameras:
Canon - 70D, 700D, 6D, 5D Mk III, 1D X, 7D, 5D Mk II, 1D Mk IV, 1D Mk III, 1Ds Mk III, 60D, 50D, 40D, 650D/Rebel T4i/Kiss X6, 600D/Rebel T3i/Kiss X5, 1100D/Rebel T3, 1000D/Rebel XS, 550D/Rebel T2i/Kiss X4, 500D/Rebel T1i/Kiss X3, 450D/Rebel XSi/Kiss X2 and later models;
Nikon - D600, D7100, D5200, D800/D800e, D4, D3, D3s, D3x, D7000, D5000, D5100, D700, D300/D300s, D90 and later models. Nikon D3000, D3100 and D3200 are not supported.
The up-to-date list for most recent version please see on our site.
Licensing
Helicon Remote can be purchased as as a standalone program. It is included into Pro or Premium Helicon Focus licenses (see details here).
If used for evaluation purposes, the program is limited to shooting low resolution JPEGs.
Helicon Remote for Android can be purchased from Helicon Soft home page or on Google Play.
Installation and
upgrade
Windows OS / Mac OS
Helicon Remote is available for Mac OS and Windows. It is
installed/upgraded as standalone program. Installation can be downloaded from the Helicon Focus
download page.
Android
Android version can be downloaded and installed from Google Play.
Hardware and software requirements
The minimum recommended monitor resolution is 1280x800, although the program will probably still work at a lower resolution.
Helicon Remote requires Windows XP / Vista / 7 / 8; or Mac OS X 10.6 or later; or Android 3.1+ and devices with USB host support.
Support
if you have any questions on Helicon Remote, please read FAQ on our Website or search for the answer on our Forum.
If you cannot find the solution, please contact our support team. You will find all the details on the Support page.

